
Security & Permissions
Permissions decide what a collaborator can reach. Rules grant read or
write on individual namespaces, projects, and datasets, and without a rule a
collaborator reaches nothing. This is how you give someone access to a dataset.
A collaborator's team role sets a ceiling on top of that. A Viewer can only ever read, whatever their grants say; an Editor can read and write. A role never grants access to a resource on its own.
Admins are the exception to both. They can do everything, everywhere in the team, and permission rules don't apply to them.
How access works
Every request passes two checks, and both have to pass:
- Does your role allow this kind of action? A Viewer can only read. An Editor can read and write.
- Do your permissions reach this resource? Access comes from a rule targeting you or a group you belong to. Admins reach everything.
In practice that means a write grant on a Viewer does nothing until their role
changes to Editor, and an Editor with no grants sees no datasets at all.
Permissions resolve like this:
- Access comes from a grant. A rule targeting you, or a group you belong to, is what opens a resource.
- Grants are additive, and the highest one wins. When several rules apply to you, you get the strongest permission among them.
- Rules cascade downward. A rule on a namespace covers every project and dataset inside it. A rule on a project covers every dataset inside it.
- Creating a namespace grants you
writeon it, and by cascade on everything you put inside it.
Example. Say a dataset lives at prod.analytics.metrics. A rule granting the
ml-team group read on the prod namespace lets every member of ml-team
read prod.analytics.metrics, along with everything else under prod. If one of
them also has a personal write rule on prod.analytics.metrics, they get
write on it — the higher grant wins.
These checks apply everywhere datasets are reached: the web dashboard, the API,
and running DataChain jobs, where dc.read_dataset(...) runs under the
submitting user's grants.
Roles
Every collaborator has one of three team roles.
Admins- Can do everything in the team, on every resource. They see and modify every namespace, project, and dataset regardless of the rules, and they manage collaborators, groups and rules, team settings, cloud credentials, and billing.Editors- Can take write actions: creating datasets, running jobs, and working with queries and experiment projects. On datasets, an Editor can change the ones awritegrant covers. They cannot change team settings, manage collaborators, or manage permissions.Viewers- Can take read actions only. A Viewer explores jobs and experiments, and reads the datasets a grant covers. Awritegrant does not let a Viewer edit a dataset; it takes effect when their role becomes Editor.
Whoever creates the team gets the Admin role.
Datasets, and the namespaces and projects around them, are governed by grants. Jobs, queries, experiments, and storage are governed by the role alone.
If your Git account does not have write access on the Git repository connected
to a project, you cannot push changes (e.g., new experiments) to the repository
even if the project belongs to a team where you are an Editor or Admin.
Privileges for datasets
The Read and Write columns are grants. Write actions need the Editor role as
well, so a Viewer holding a write grant still cannot perform them.
Privileges for jobs
The datasets a job reads and writes still follow the submitter's grants.
Privileges for queries
Privileges for experiments
Privileges for storage and activity logs
Privileges to manage the team
Managing the team is governed by the role alone, and is reserved for admins:
Permissions
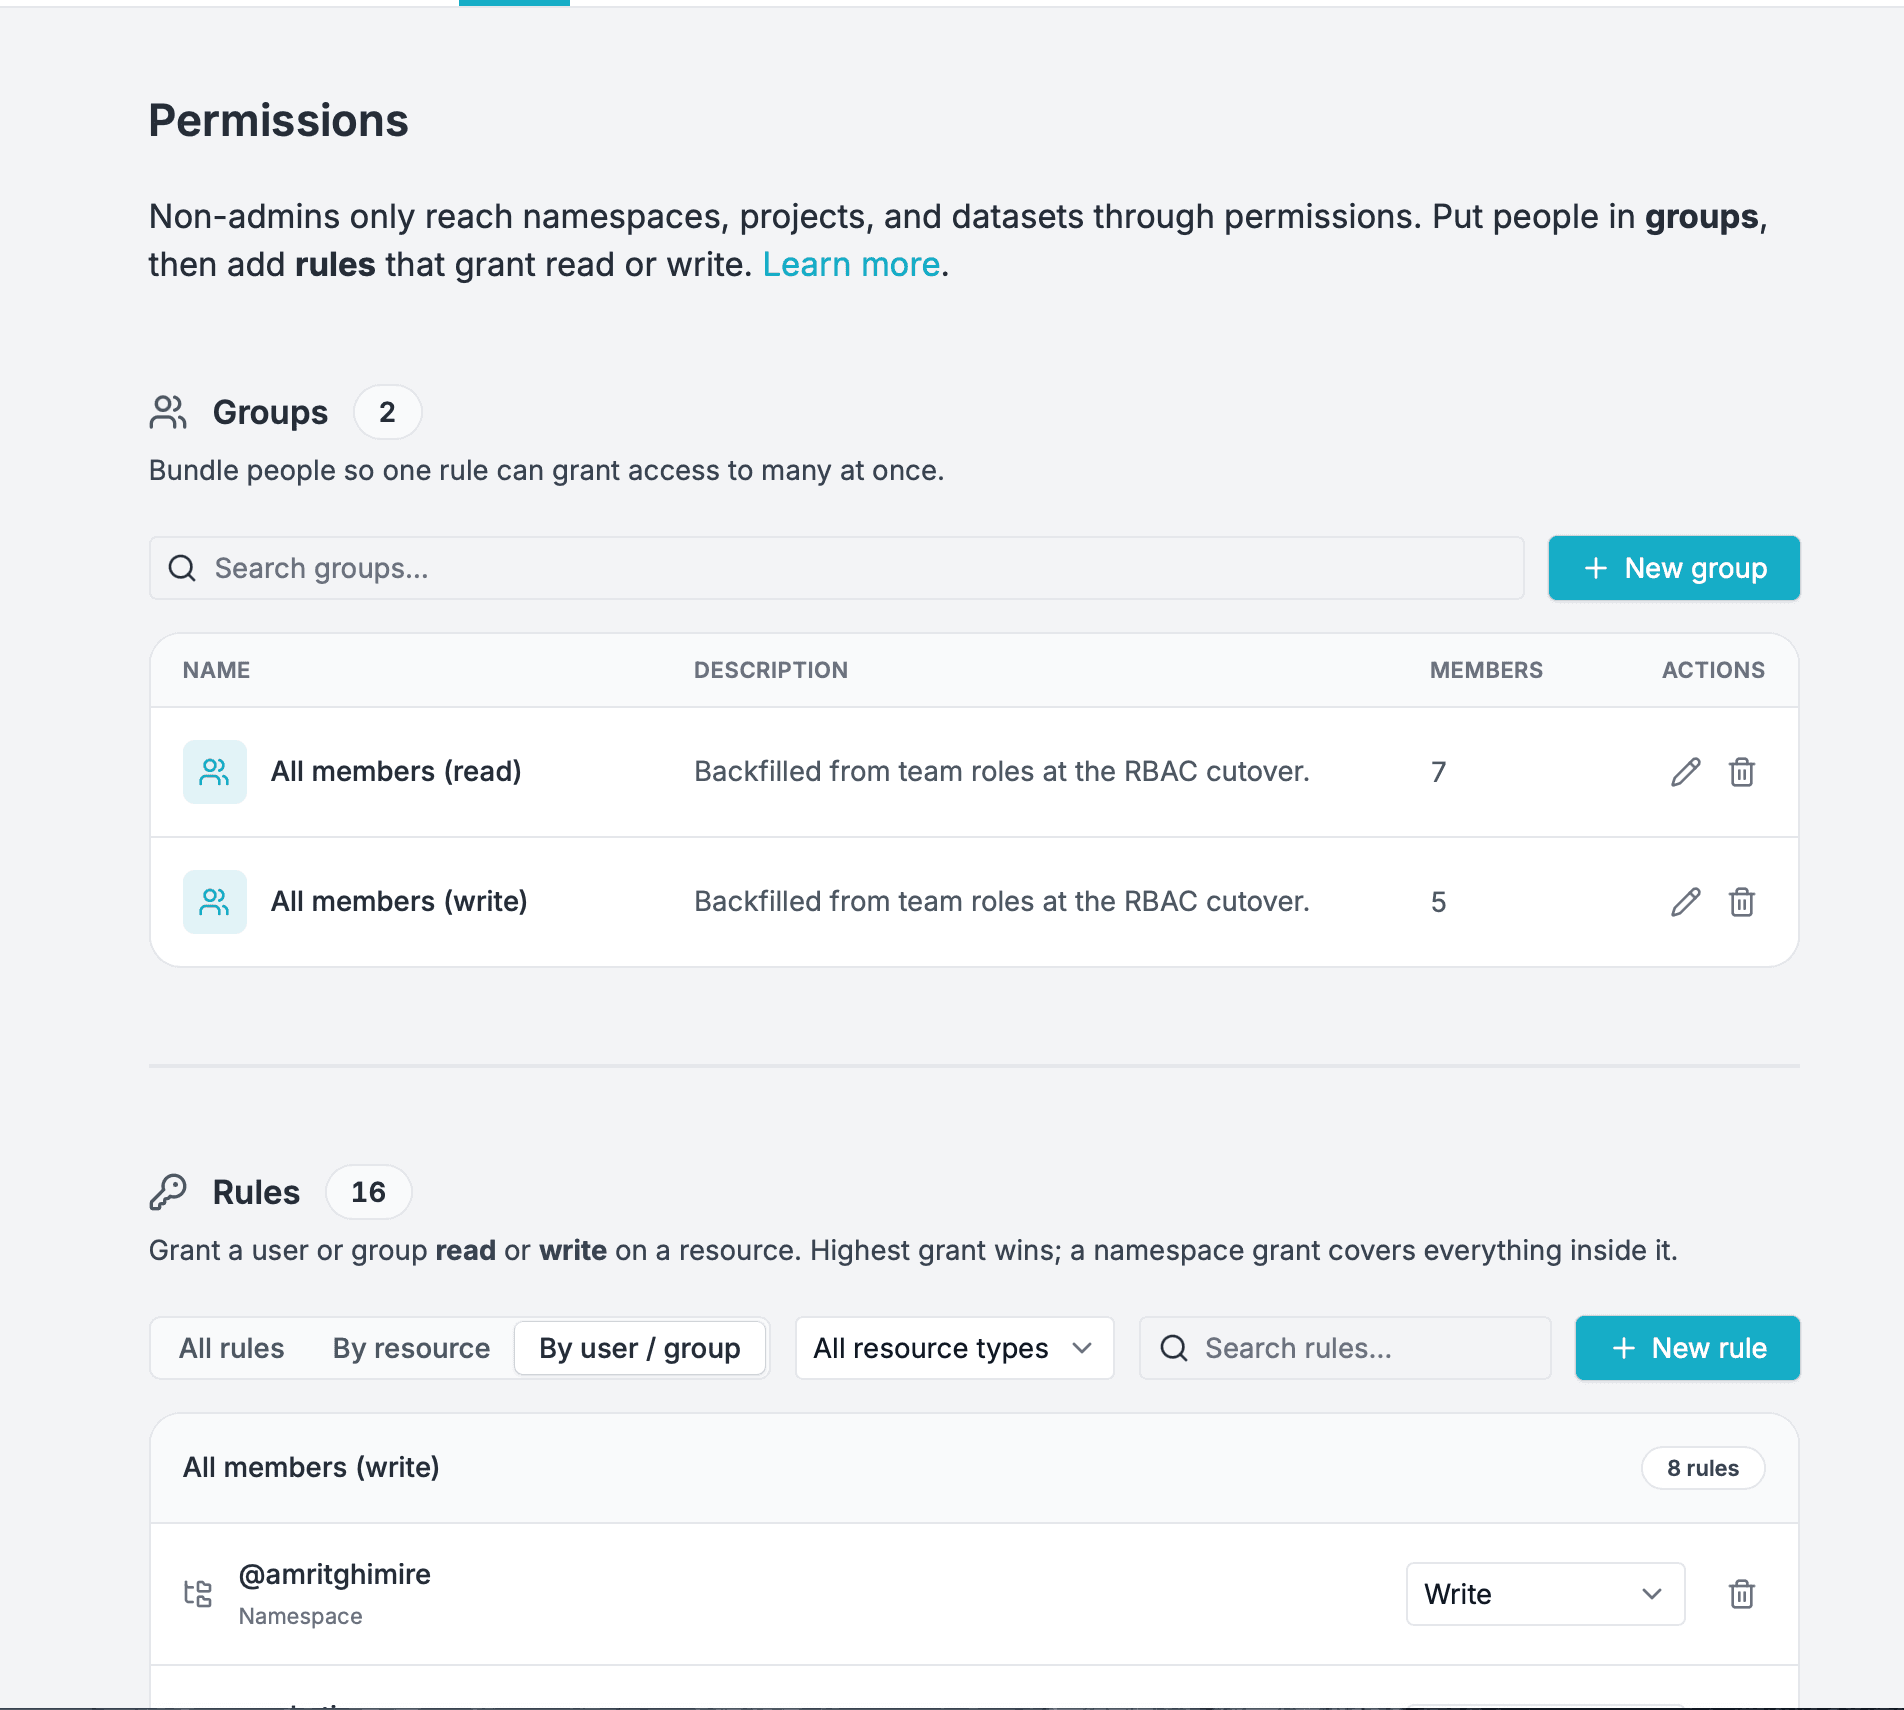
Permissions are how you give collaborators access to datasets. Sort people into
groups, then write rules that grant read or write on the resources
they need.
You'll find them under Collaborators & Permissions in the team settings page, below the Collaborators list. This area is admin-only.
Resources
A rule targets one resource. Datasets sit in a hierarchy, addressed as:
for example prod.analytics.metrics. A rule can target any level of it and
cascades downward: a rule on the prod namespace covers every project and
dataset inside it, and a rule on prod.analytics covers every dataset in that
project. For more on how datasets are organized, see
Organizing Datasets with Namespace and Project.
Groups
Groups bundle people so one rule can grant access to many at once.
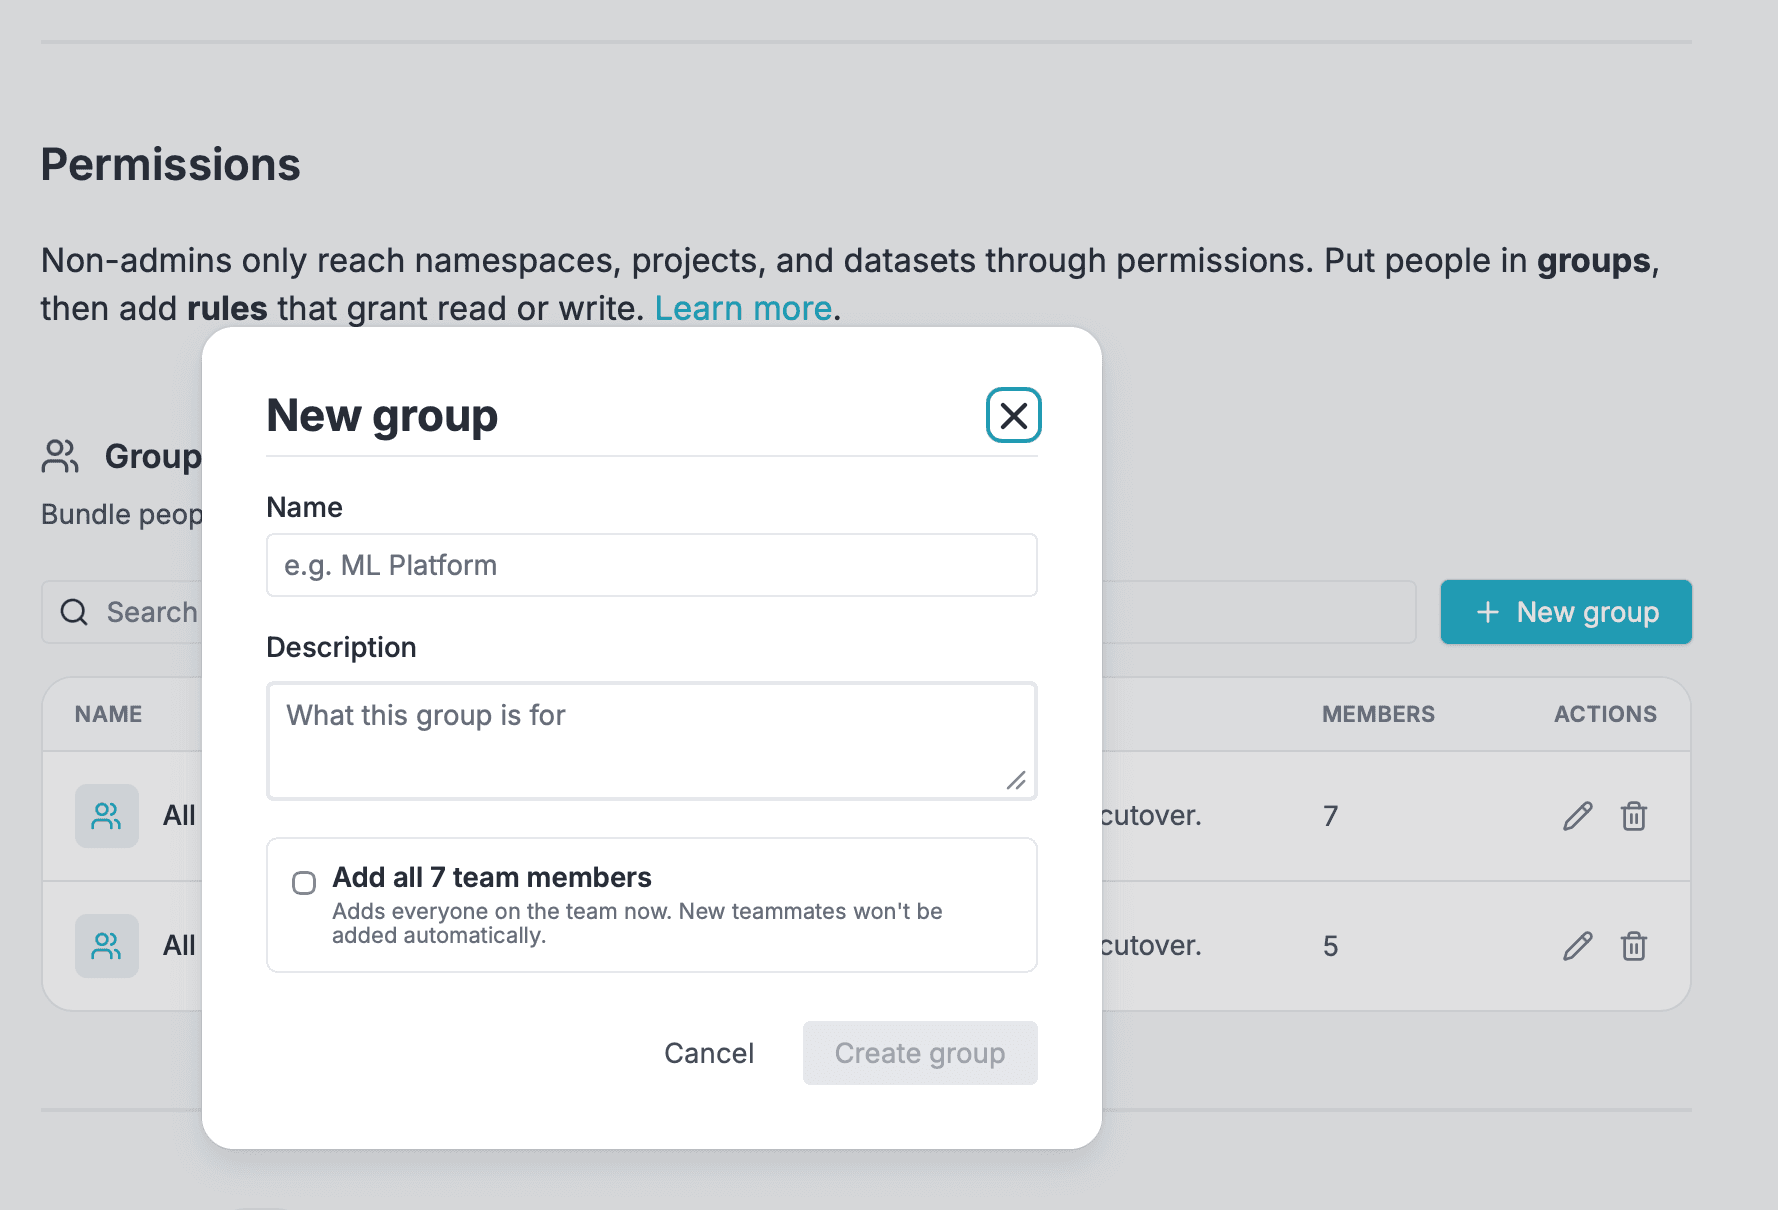
To create a group, open the Groups section and click New group. Give it a
name (for example, ML Platform) and an optional description. Tick Add all N
team members to seed the group with everyone currently on the team. That is a
one-time snapshot, so new teammates aren't added automatically.
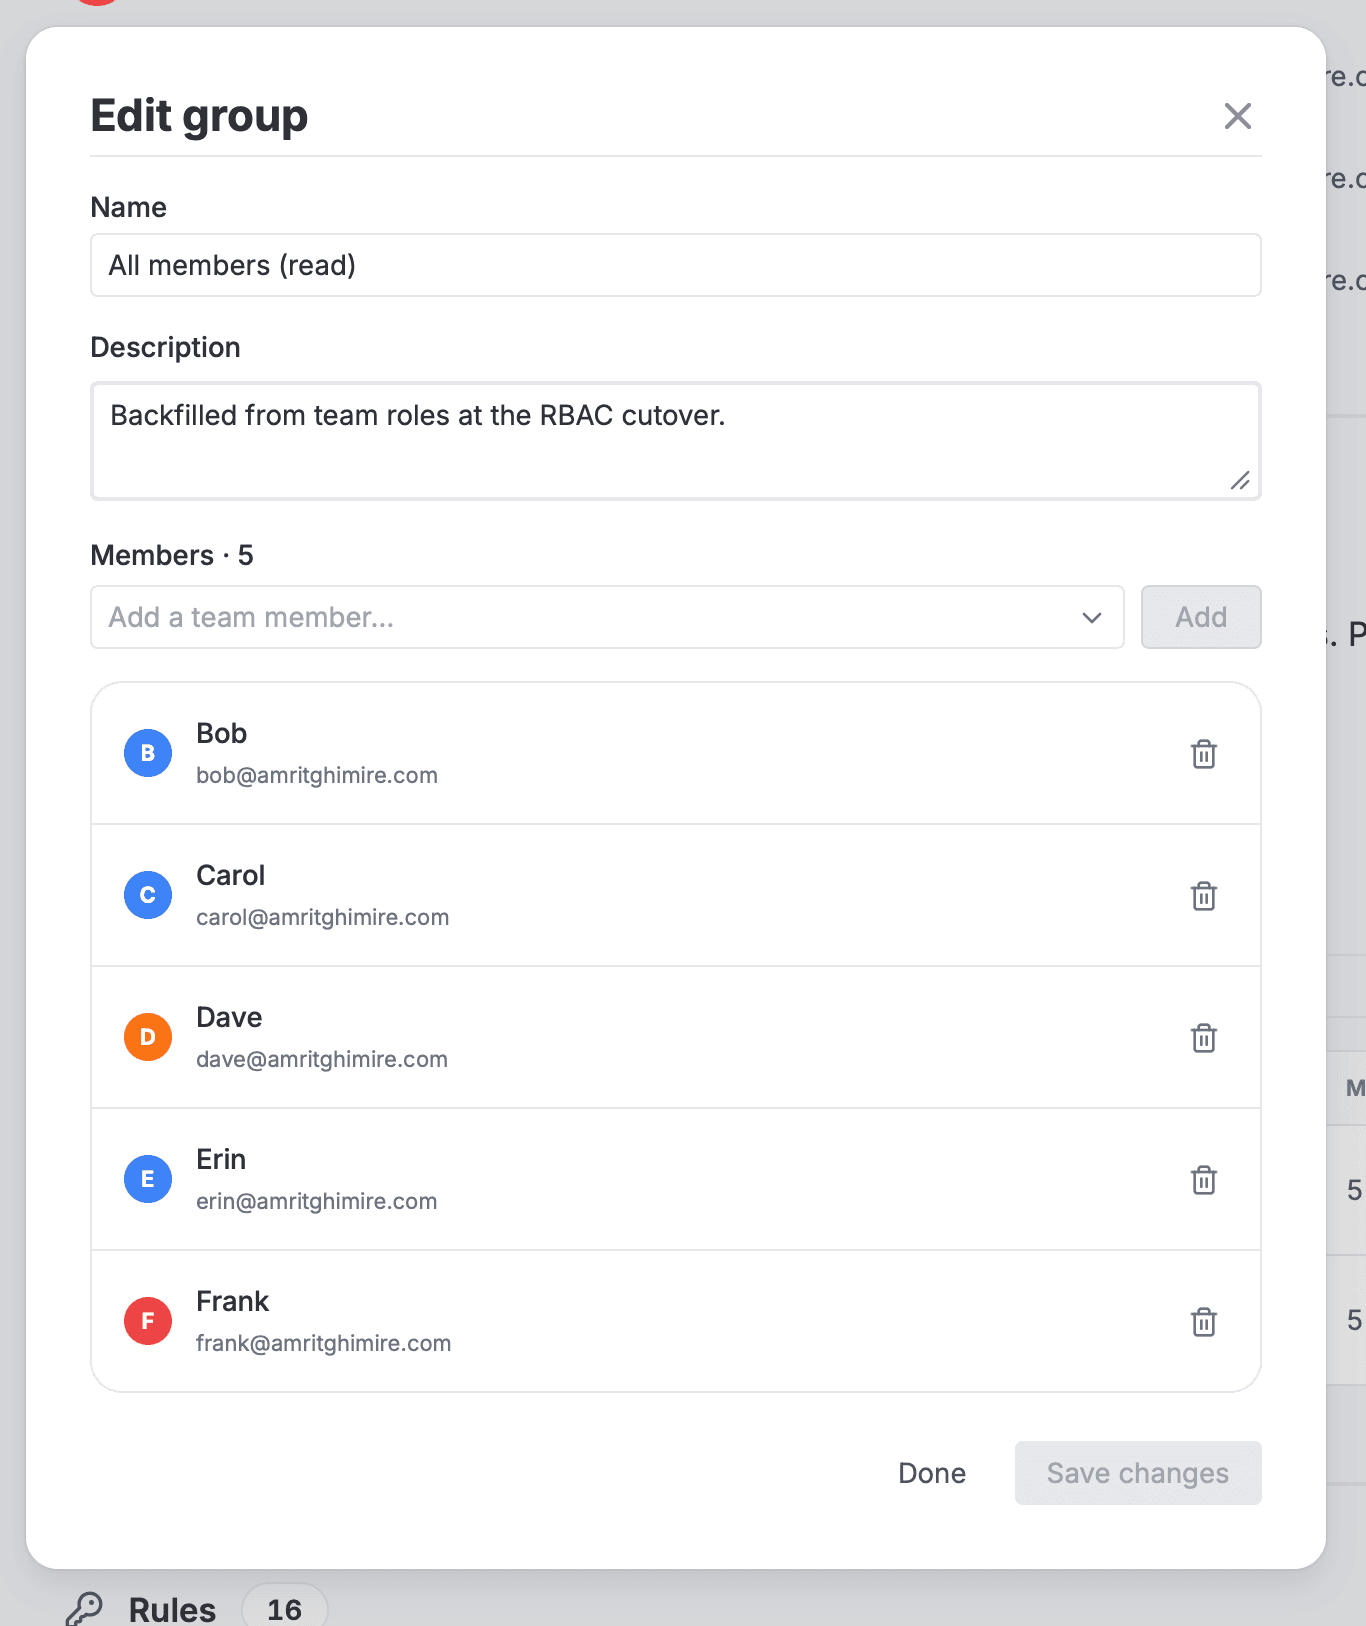
To manage an existing group, use its edit button. From there you can rename it, edit its description, and add or remove members. Removing a member revokes any access they had through that group.
Deleting a group also removes every rule granted through it. Members lose that access but keep their team role. Deletion can't be undone.
Rules
A rule grants a user or a group read or write on one resource. The highest
matching grant wins, and a namespace grant covers everything inside it (see
How access works).
To add a rule, open the Rules section and click New rule:
- Pick the resource. Choose the resource type, then select it through the cascading pickers. For a dataset you pick its namespace, then its project, then the dataset.
- Assign it. Choose whether the rule targets a group or a user, then pick which one.
- Choose the permission: Read (view only) or Write (read & modify).
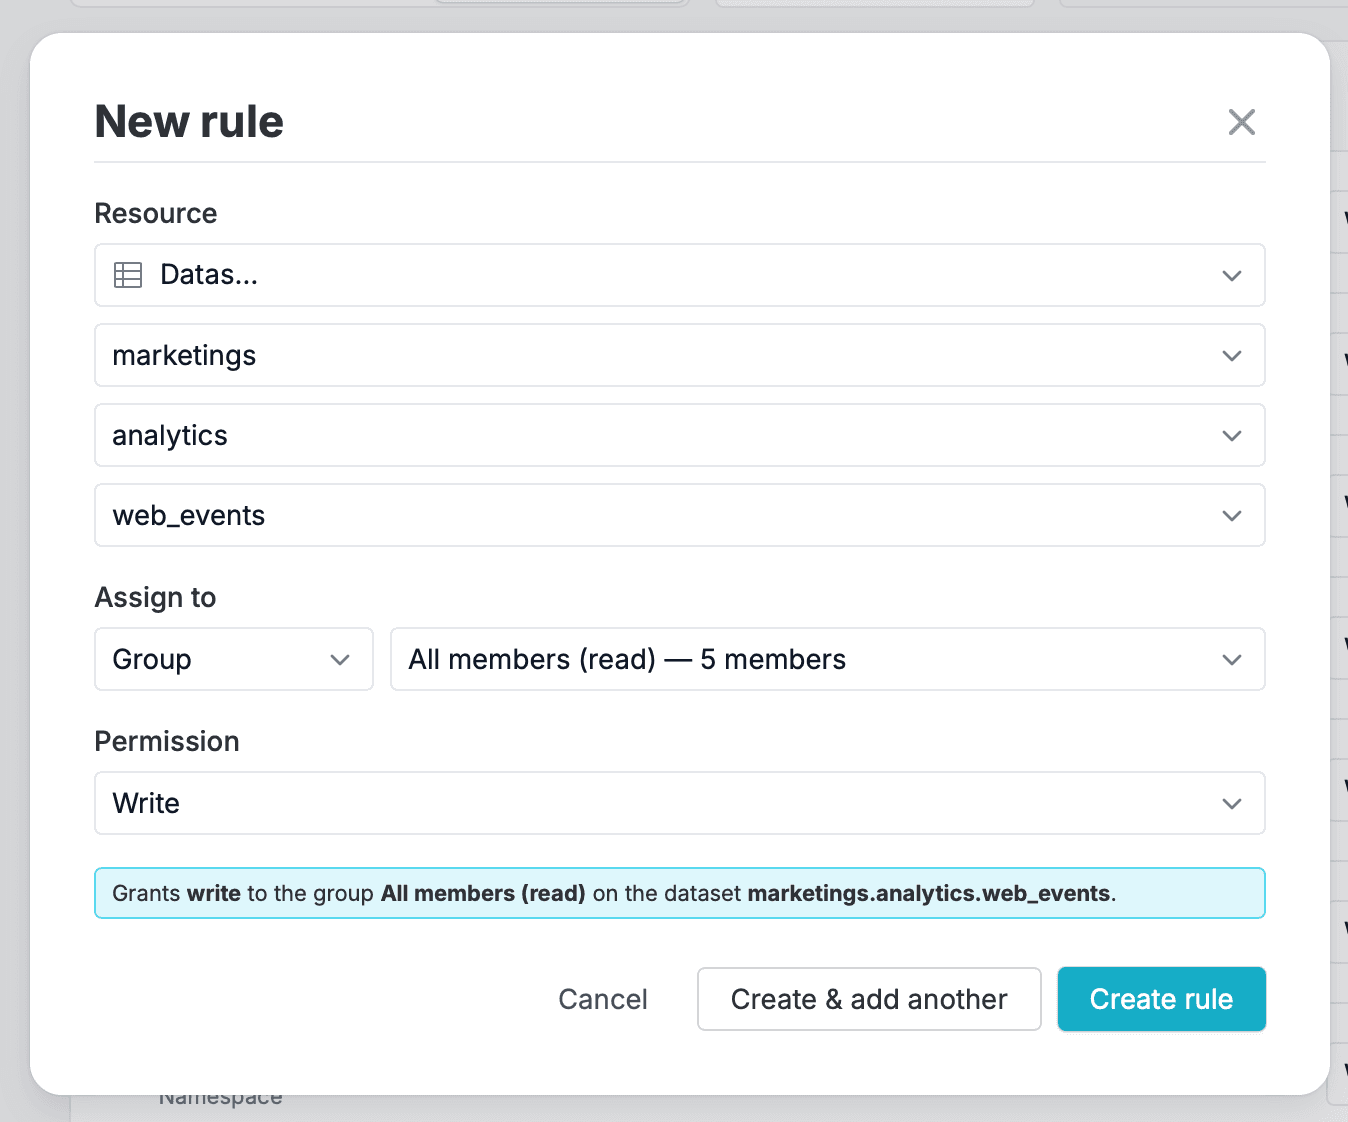
Before you save, the dialog spells out what the rule grants, including the cascade (for example, "…including every project and dataset inside it"). If a rule for that user or group on that resource already exists, the dialog offers to update it to the new permission. Use Create & add another to add several rules without re-walking the resource picker.
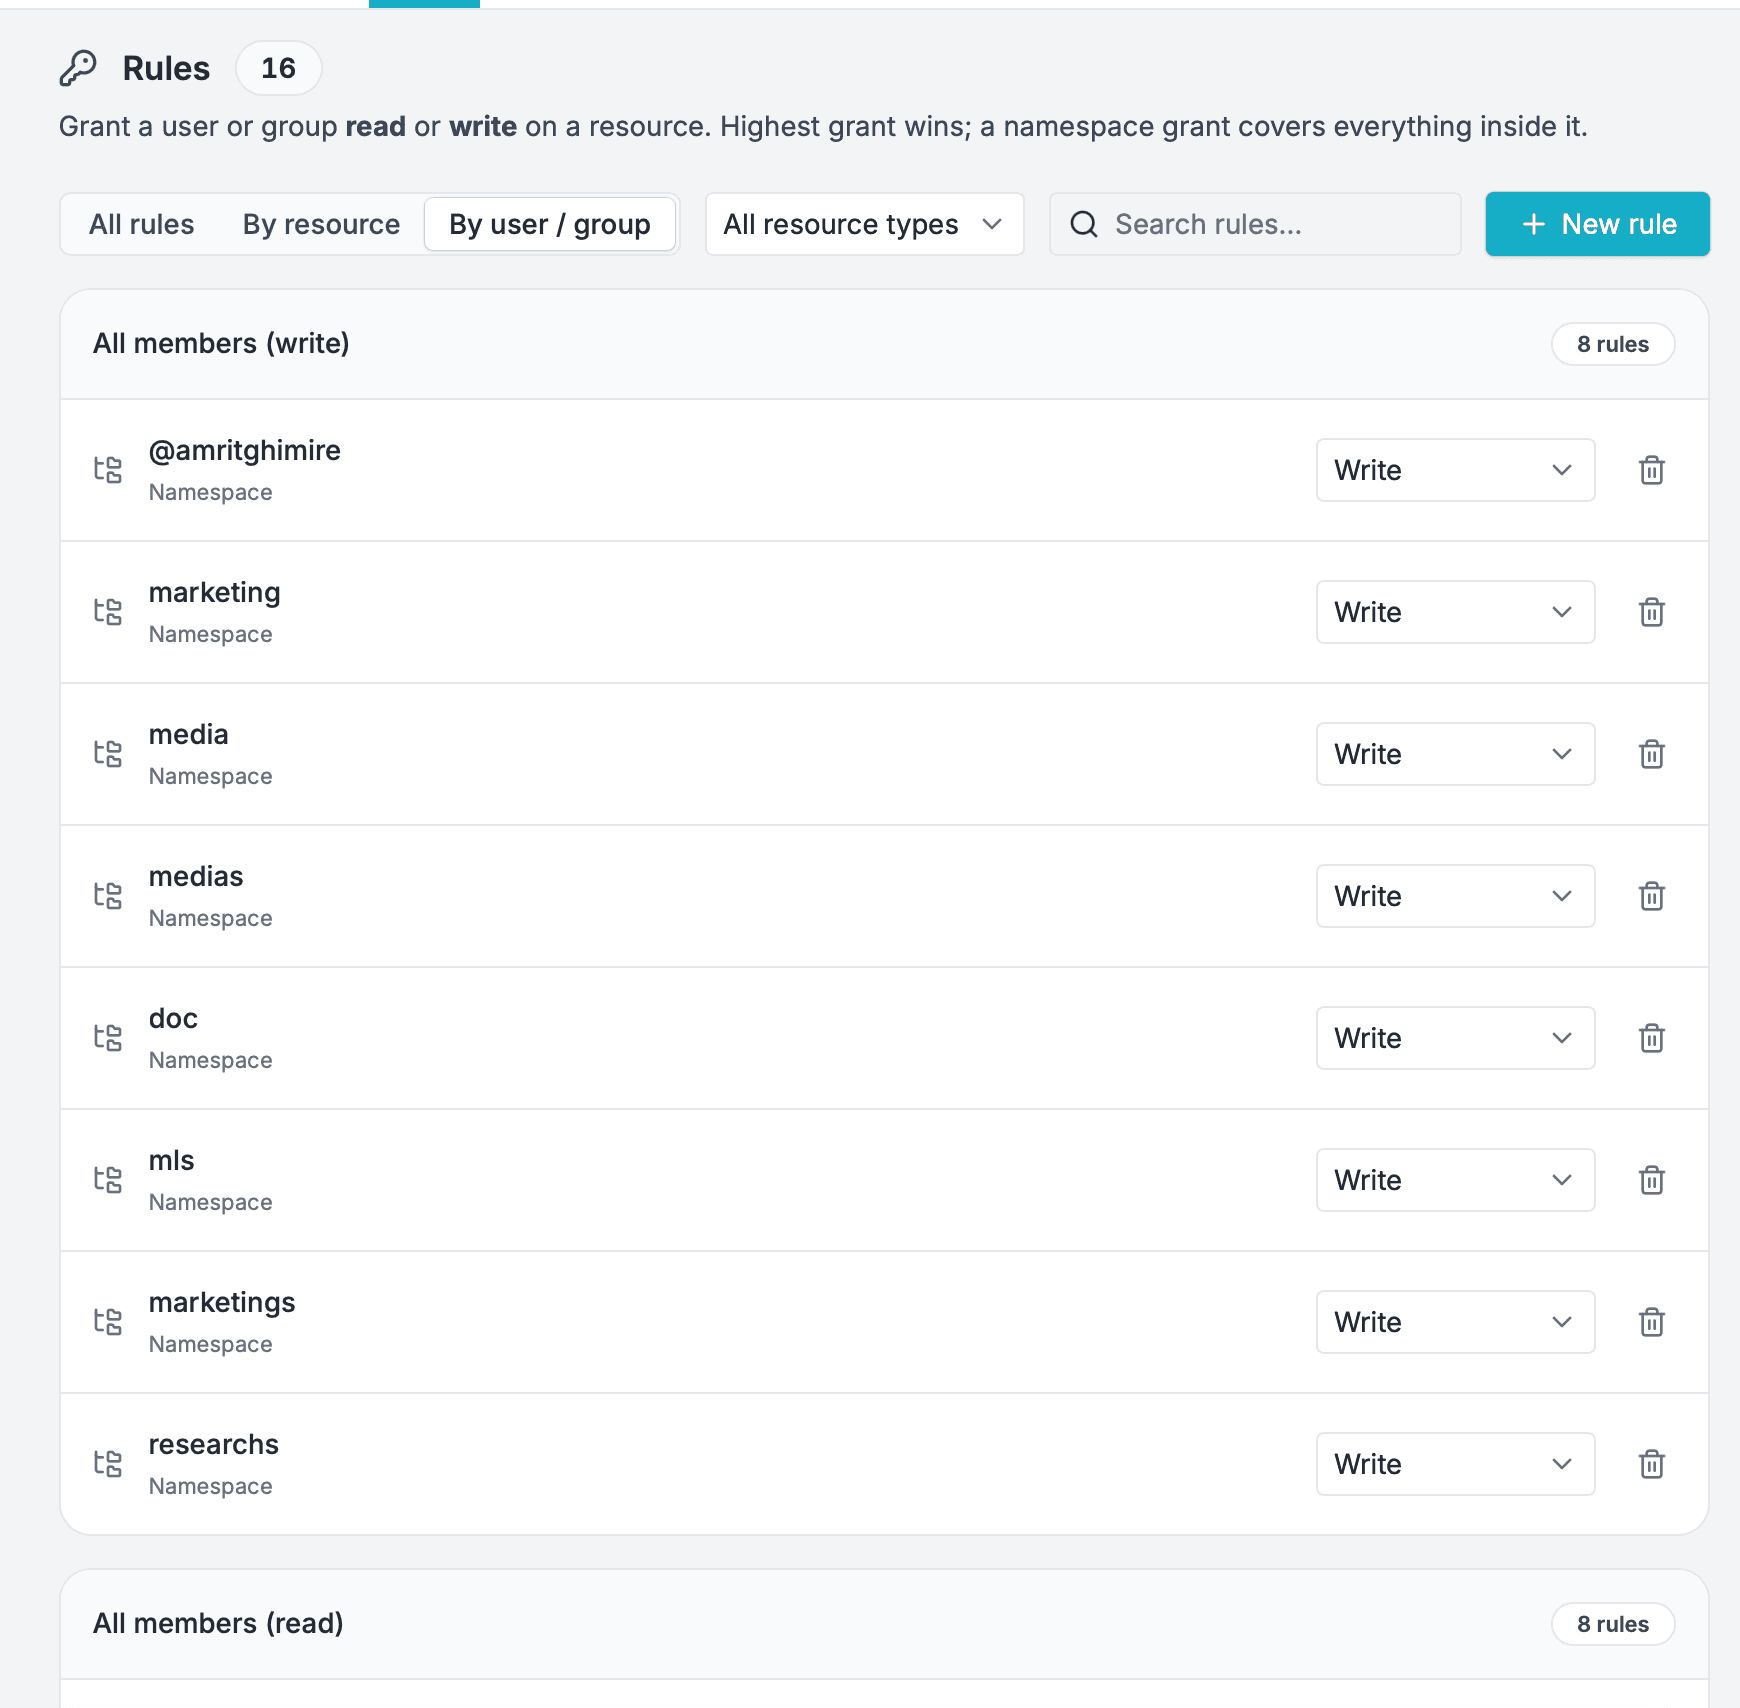
Browse existing rules three ways — All rules, By resource, or By user / group (the default) — and filter by resource type or search. You can change a rule's permission inline from its row, or delete it.
Next Steps
- Manage collaborators and the rest of your team settings
- Configure Single Sign-on so members authenticate through your identity provider
- Read up on namespaces and projects, the hierarchy that rules cascade through